Pass & Map Transitions – Routing and Transforming Tokens in Agentic Nets


In my Petri-net based runtime (Agentic Nets / AgenticOS), every agentic process is built from a small set of reusable transition types. In this article I’ll focus on two of the most fundamental ones: the Pass transition and the Map transition.
Together, they give you a clean separation of concerns:
- Pass – decides whether a token should move on and where it should go (pure routing).
- Map – decides what the token should look like for the next step (pure transformation).
We’ll use a single, combined example net and walk through both transitions in detail.
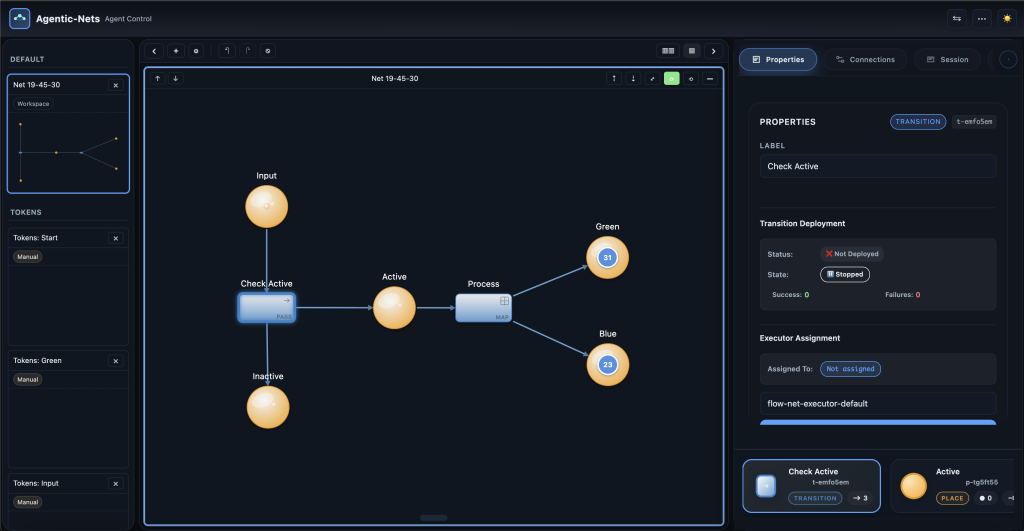
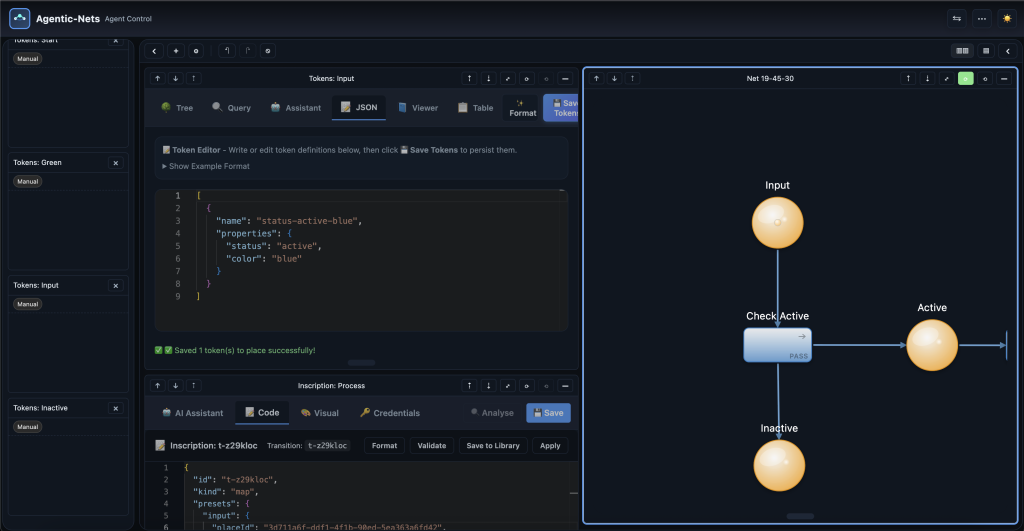
The example net: Input → Check Active → Active / Inactive → Process → Green / Blue
The net we’ll use throughout this article looks like this conceptually:
- Place “Input” – where new tokens arrive (e.g. from HTTP, an agent, or another net).
- Transition “Check Active” (Pass) – checks if
status == "active". - Place “Active” – receives only active tokens.
- Place “Inactive” – receives everything else (
status != "active"). - Transition “Process” (Map) – takes tokens from Active, builds a new normalized payload, and classifies it by
color. - Place “Green” – receives processed tokens whose original color was
green. - Place “Blue” – receives processed tokens whose original color was
blue.
This gives us a tiny, but very expressive pipeline: First we filter by status, then we normalize the payload and fan out by color – all driven by declarative JSON inscriptions.
Pass Transition: “Check Active”
The Pass transition is a pure router: it looks at the token payload and decides which output place should receive it, without changing the data or calling external systems.
Here is the inscription for our Check Active transition, which routes tokens from Input to Active or Inactive:
{
  "id": "t-emfo5em",
  "kind": "pass",
  "mode": "SINGLE",

  "presets": {
    "input": {
      "placeId": "p-j1xyioh",                 // "Input"
      "host": "default@localhost:8080",
      "arcql": "FROM $ LIMIT 1",
      "take": "FIRST",
      "consume": true
    }
  },

  "postsets": {
    "active": {
      "placeId": "p-tg5ft55",                 // "Active"
      "host": "default@localhost:8080"
    },
    "inactive": {
      "placeId": "p-8dh95kl",                 // "Inactive"
      "host": "default@localhost:8080"
    }
  },

  "action": {
    "type": "pass"
  },

  "emit": [
    {
      "to": "active",
      "from": "@input.data",
      "when": "status == 'active'"
    },
    {
      "to": "inactive",
      "from": "@input.data",
      "when": "status != 'active'"
    }
  ]
}
1. Preset: selecting the input token
The presets.input section defines how this transition binds a token:
placeId: "p-j1xyioh"– the internal ID of the Input place.arcql: "FROM $ LIMIT 1"– “take one token from this place”.take: "FIRST"– deterministic selection strategy.consume: true– remove the token from Input once the transition fires successfully.
At runtime, this bound token becomes available as @input, with @input.data for the business payload and @input._meta for metadata.
2. Postsets & emit rules: routing by status
The postsets block defines the possible output places, addressed by symbolic names like "active" and "inactive". The real routing happens in the emit array:
"from": "@input.data"– send the original payload unchanged."to": "active"whenstatus == 'active'."to": "inactive"whenstatus != 'active'.
In pseudo-code, the Pass transition behaves like this:
// Bind one token from Input
let token = takeTokenFrom("Input");

if (token.data.status === "active") {
  emit("Active", token.data);
} else {
  emit("Inactive", token.data);
}
There are no side effects: no HTTP calls, no shell commands, no database writes. The transition only decides where the token goes next.
When to use a Pass transition
- Filtering – only forward “interesting” tokens into downstream processing.
- Branching – build simple if/else flows directly in the net.
- Pre-processing gates – keep heavy transitions (HTTP, LLM, commands) free from irrelevant tokens.
- Zero-side-effect business logic – implement decisions without touching external systems.
Map Transition: “Process”
Where the Pass transition is about routing, the Map transition is about reshaping data. It takes an input token, builds a new object from a template, and then routes that new object based on its content.
In our example, the Map transition Process consumes tokens from the Active place and builds a normalized payload that includes:
- the original color and value,
- a new
status: "processed"field, - meta fields like
sourceTokenIdandsourceTokenName.
After that, it routes the mapped object into Green or Blue based on originalColor.
Here is the inscription:
{
  "id": "t-z29kloc",
  "kind": "map",
  "mode": "SINGLE",

  "presets": {
    "input": {
      "placeId": "p-tg5ft55",                // "Active"
      "host": "default@localhost:8080",
      "arcql": "FROM $ LIMIT 1",
      "take": "FIRST",
      "consume": true
    }
  },

  "postsets": {
    "green": {
      "placeId": "p-emrbmms",                // "Green"
      "host": "default@localhost:8080"
    },
    "blue": {
      "placeId": "p-v259ab6",                // "Blue"
      "host": "default@localhost:8080"
    }
  },

  "action": {
    "type": "map",
    "template": {
      "originalColor": "${input.data.color}",
      "originalValue": "${input.data.value}",
      "status": "processed",
      "sourceTokenId": "${input._meta.id}",
      "sourceTokenName": "${input._meta.name}"
    }
  },

  "emit": [
    {
      "to": "green",
      "from": "@response",
      "when": "originalColor == 'green'"
    },
    {
      "to": "blue",
      "from": "@response",
      "when": "originalColor == 'blue'"
    }
  ]
}
1. Template: building a new payload
The heart of a Map transition is the template inside action. It is evaluated against the bound input token:
"originalColor": "${input.data.color}"– copy the original color into a well-defined field."originalValue": "${input.data.value}"– carry over the original value."status": "processed"– mark that this token has passed the Map step."sourceTokenId": "${input._meta.id}"– remember which token this came from."sourceTokenName": "${input._meta.name}"– optional human-friendly name for debugging / UIs.
The result of this evaluation becomes @response for the emit rules. Unlike Pass, Map always works with this newly constructed object.
2. Emit rules: routing the mapped object
Once the new payload is built, the emit rules decide where to send it:
"from": "@response"– send the mapped object."to": "green"whenoriginalColor == 'green'."to": "blue"whenoriginalColor == 'blue'.
In pseudo-code, the Map transition behaves like this:
// 1. Take one token from Active
let token = takeTokenFrom("Active");

// 2. Build a new mapped object
let mapped = {
  originalColor: token.data.color,
  originalValue: token.data.value,
  status: "processed",
  sourceTokenId: token._meta.id,
  sourceTokenName: token._meta.name
};

// 3. Route the mapped object based on its color
if (mapped.originalColor === "green") {
  emit("Green", mapped);
}

if (mapped.originalColor === "blue") {
  emit("Blue", mapped);
}
When to use a Map transition
- Normalization – bring heterogeneous tokens into a common schema before hitting business logic.
- Enrichment – add status flags, IDs, and correlation metadata for observability and debugging.
- Stable interfaces – keep your downstream transitions stable while the upstream token shapes evolve.
- Structured fan-out – build the structure once, then branch it into multiple places.
Why split into Pass and Map?
At first glance, you could imagine a single “do everything” transition that both decides whether to process a token and also how to transform it. But in practice, splitting this into Pass and Map has a few advantages:
- Clear responsibilities – Pass answers “should this token go further, and if yes, where?”. Map answers “what should this token look like next?”.
- Simpler nets – filters and gates become visually obvious, instead of being hidden in larger transitions.
- Reusability – the same Map transition can be fed by multiple Pass transitions that implement different gating logic.
- Better observability – you can see exactly where tokens drop out (Inactive) and where they get normalized (Active → Process).
This is also where Agentic Nets shine in combination with AI-driven transitions: you can have agents and LLMs producing raw events into Input, pure Pass transitions deciding which path they should take, and Map transitions reshaping them into clean, stable structures for downstream automation.
In follow-up posts I’ll cover the other transition types – HTTP, agent/LLM, and remote command transitions – and show how they plug into the same style of nets, so that complex agentic agentic processes emerge from a small set of well-defined building blocks.